Alpha Channel Tutorial
This tutorial is made for Adobe® Photoshop® CS3 Extended version 10.0, but it will work on the other versions as well. This tutorial will help you not only learn how to make or edit Robot Arena 2 : Design & Destroy chassis skin decals, surface layers, and edge lines, but also how to reskin the arena textures, change parts of the game's UI. Also, “*.TGA”s with alpha channel are also used in most games, so you will be able to edit/create textures with alpha channels in other games too.
First, I must apologize that on some of the screenshots in this tutorial the mouse cursor, which becomes different when using some tools in Photoshop, may not look like it usually is. This is because my screenshot capture program (which was supposed to capture the cursor) had problems.
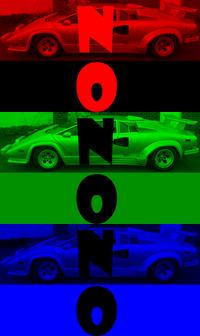
Now a little theory : Most RGB bitmap files are 24-bit, i.e. there are three 8-bit (256-level) channels, one each for red, green and blue. The image combines 256 levels of each color to make a full color image containing up to 256*256*256 or 16,777,216 colors, often abbreviated 16.7 million. So if we separate those three channels they will look like this :
Targa (*.TGA) files can include an extra fourth transparency channel, making it a 32-bit image. The alpha channel isn't visible but acts as a mask to make certain areas of the image transparent in software that recognizes alpha channels. Because this alpha channel is 8-bit, 256 levels, it can have 256 levels of transparency from black 100% transparent to white 100% opaque.
After opening Photoshop, make sure you have at least these windows, they will be needed for your work :
Now you can create a new document and draw whatever your decal will look like, or open a picture to copy a part of it as a decal. Go to File>Open, select you picture and open it.
Now you will learn about some ways to select only what you want from an image.
First way : Magic Wand Tool
Choose the Magic Wand Tool.
Make sure all the options are set like this :
This tool is very useful when you want to select an one-color object. Our object is only red and of the same tone of red, so we will set the Tolerance to 0, but if the object is made of colors that vary a little then you start adjust the value of Tolerance until it works fine for you. Now click somewhere inside of the object and it will be marked like this:
You can also use this method in another way. If the object is made of different colors but the background is made of only one color (for the same reason, sometimes film makers capture the film on a green background in the movies, so they can easly cut the background later) you can click somewhere on the background to select it. Then press this :
This will invert the selection and mark the other parts of the picture. In your case, it will be area of the object you want. If you need to, you can add or remove from this selection. Just hold “SHIFT” and click to add, or hold “ALT” and click to remove. This can be done with any selection tool and when you hold “SHIFT” or “ALT” it will add “+” or “–“ to the tool cursor icon. Now you can add or remove from the selection infinite times and make the selection to what you want. As I said this works with all selection tools from the tool select menu.
Second way : Polygonal Lasso Tool
Choose the Polygonal Lasso Tool.
Make sure all the options are set like this :
This is useful when the object is more complicated and made of different colors. Imagine this “N” is made of different colors. Start clicking on the edges of the “N” one by one, to close the selection click again on the first point you clicked. The more accurate clicking points you have, the more good and smooth the selection will look.
Third way : Lasso Tool Choose Lasso Tool. Make sure all the options are set exactly like the Polygonal Lasso Tool.
You need to be really careful here (and not to shake) if you want a decent result. This is a free select mode where after the first click the lasso tool follow every moving with the mouse until it's closed, back to the first point. You can finish your selection by clicking again on the first point you clicked.
Fourth way : Color Range
Click on Color Range. Make sure all the options are set like this : This way is only if you want to mark exactly a specific color. It will mark what color you select, but it will mark the color EVERYWHERE it is on the image. Now click inside of the object on the image. Now you see what you have marked. The white is marked, the black not. As you can see the letters “NO” have very sharp edges. To select a object that is made of color that vary a little bit or just to make the edges more smooth you need to use the Fuzziness slider. Experiment with it to see what suits you best. Now click “OK” button.
Those were some ways of making/selecting parts of a image. Use whatever way you prefer, and mark what you need. I will mark the letters like this :
Now you need to copy the selection to the real file you will use. So, click copy.
If you don’t know how to make a new file and add an alpha channel in it, I will tell you one easy way to do this. Open one file from the original “.TGA” files from the game depending of what you want to build, a decal, component skin, arena skin, etc. In this case will be a decal. Click open and go to “…\RA2\Texture Library\decals”, choose the “Gear.tga” and click “OK”. You are now working in a new document. Click Select>All.
The whole picture must be marked like this :
Now press the “delete” key on the keyboard to clean the whole picture. After this choose “Deselect”.
Now activate the Move Tool.
Paste your object from the previous picture.
As you can see the pasted object is too large so you need to shrink it a little bit. Go to Transform>Scale.
As you can see the object is bound with squares. If you move the cursor over one of the squares it will become a two head arrow and you can click and hold the mouse button, then move the mouse to resize it to the size that you need. You can hold “SHIFT” when moving if you want to keep the aspect ratio. You can fill the “W: 100,0%” and/or “H: 100,0%” textbox with the needed percent as well.
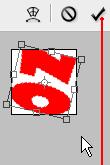
Also, you can experiment with the other Transform tools. Here is the example of “Rotate”. You rotate the object with the squares this time :
When you are ready just press this :
Now make sure that the channels look like this :
Now is the time to “Flatten” the image. This will make all layers with objects to be merged to one background picture. You can’t move, resize or use any other action with the object anymore. Now it is just one picture on the background and you can only edit it as you would in paint. All you can do is draw on it.
Now, use the Magic Wand Tool again like this :
Inverse it.
You can remove the hole in the “O” to the selection by holding down “ALT” + click inside of it. Now choose Save Selection.
Choose the Alpha 1 channel like this :
Make sure that all options are set like this and click “OK”.
As you can see the “NO” object is now in the alpha channel too. To work or edit in the alpha channel layer click on it like this :
The “eye” shows what layer you see. The blue marked layer shows in what layer you are working now. Now Deselect. The image must look like this :
The alpha channel layer looks like a black/white image. If you want you can draw on him with every tool you want. Just remember that when you pick a color it must be only from the line of black-grey-white. The more white the color, the less transparent those pixels in the original coloured image will be. And the opposite, the more black the color that you use, the more transparent those pixels in the original coloured image will be. Use different variations of grey to make more smooth transition from transparent to non-transparent. After you are ready with the alpha channel, it is time to save your work. Go to File>Save As...
Choose a name for your file, select to save it as “Targa” (.TGA) . It’s very important to select “Alpha Channels”. Make sure all the other options are set like this and click “Save” :
In the next window that will pop up select “32 bits/pixel”. Make sure its look like this and click “OK”.
If you run RA2, you will find the new decal you have just created. But you might see that there are some strange white bounds all around the decal (in this case all over the letters “NO”). This is because RA2 use the nearest pixels to smooth the edges of the decal. In this case, the color around the “NO” in our document is our background color which is white. If you don’t like this you can repair it very easy.
Just open the decal file again. If your decal is made of only one color (like in this case with “NO” letters decal) you can correct the “white bounds” very easy. First, click Select All.
Press the “DELETE” key on the keyboard. Now the RGB picture of the letters “NO” is gone. Choose deselect :
Select the Paint Bucket Tool.
Options must be set like this :
Click on the big black color box (this is the primary color you draw with).
After the color selection window is open, select a color that is the same with your decal color. Pure red (100% red) in our case with the “NO” letters. Click “OK” now.
Now using the Paint Bucket Tool click somewhere inside of the document and it will look like this :
Now you are ready. Use the regular save :
Now, if you run the game and apply this decal you will see that there are no more signs of these “white bounds”. It does not matter that your whole picture is only made of red. The alpha channel is the one that will define what to draw and what not to. Yes, this means that you can full the whole document with some colors, but drawing in the alpha channel will define what and how to draw ingame.
If your decal is a complicated picture made of many colors the work you have to do is way harder. I will not explain in detail how to do it in this tutorial, but i will tell only that you need to surround your decal edges with the same color that your edges are made of. Now let’s learn how to make your decal with some cool transparency. Open you decal file again. Switch to work in the alpha channel.
Open the "color choose" window again. Move the color select circle to the full left in the coloured box and move it only up and down. Doing this will allow you to very precisely select the percentage of your transparency. The more the grey comes to white, the more transparent, and the more the grey comes to black, the more non-transparent. Let’s choose for example the grey level to be like this. Click “OK” now.
Select the Rectangle tool.
Make sure the options are set like this and select the “Multiply” mode (you can experiment with the other modes too) :
Now, select like this the area that you want to change to this percentage of transparency :
It will become like this :
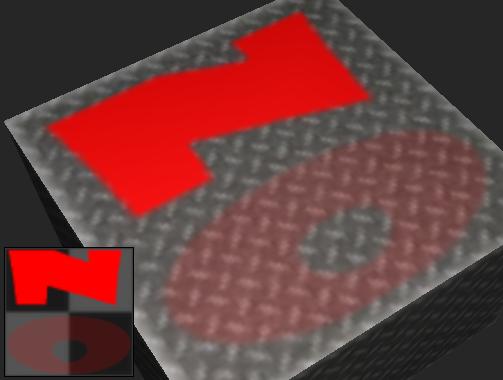
Do a regular save. Now, ingame the decal will look like this :
There are many ways to change the percentage of the transparency on some different parts of your decal picture. So, feel free to experiment and draw with any tool in the alpha channel layer. But above all, be creative.


