Difference between revisions of "Creating Components"
m |
m (Fixed Links and Spelling of Dummy) |
||
| (6 intermediate revisions by 4 users not shown) | |||
| Line 2: | Line 2: | ||
| − | == | + | == Tools required == |
*Autodesk's/discreet's 3d Studio Max (tested on 5 and 8 only, may work on others, too) | *Autodesk's/discreet's 3d Studio Max (tested on 5 and 8 only, may work on others, too) | ||
*A generic text editor like Notepad. I however suggest downloading [http://notepad-plus.sourceforge.net/ Notepad++], which is a free, powerful and fast text editor with a tabbed interface. | *A generic text editor like Notepad. I however suggest downloading [http://notepad-plus.sourceforge.net/ Notepad++], which is a free, powerful and fast text editor with a tabbed interface. | ||
| − | *[http:// | + | *[http://gametechmods.com/forums/index.php?action=downloads;sa=view;down=180 Dummy's export script for max] This is a fixed version that works in max 8. |
| − | *[http:// | + | *[http://gametechmods.com/forums/index.php?action=downloads;sa=view;down=92 Dummy's GMF compiler] This is a fixed version without the annoying "file not found" error. |
| − | *[http:// | + | *[http://gametechmods.com/forums/index.php?action=downloads;sa=view;down=99 Dummy's reference model] |
| − | == | + | == Preparations == |
Create a folder called C:\RA2, you'll store all the files needed in there. Extract the reference.zip to that folder, and you'll get three files: reference.gmf, reference.max and reference.txt. Extract the GMF compiler to the same directory. | Create a folder called C:\RA2, you'll store all the files needed in there. Extract the reference.zip to that folder, and you'll get three files: reference.gmf, reference.max and reference.txt. Extract the GMF compiler to the same directory. | ||
| Line 19: | Line 19: | ||
[[Image:3dsmaxreference.PNG]] | [[Image:3dsmaxreference.PNG]] | ||
| − | == | + | == Creating the display mesh. == |
The display mesh is how your component will look in the robot. | The display mesh is how your component will look in the robot. | ||
| Line 41: | Line 41: | ||
| − | == | + | == Creating the collision mesh. == |
A collision mesh is the mesh RA2 will calculate how does the object react with the environement. The more the collision mesh looks like the display mesh, the more accurate it is, but it's also slower. You could just clone the object, but it's better to use a primitive that will act as a bounding box to the object. | A collision mesh is the mesh RA2 will calculate how does the object react with the environement. The more the collision mesh looks like the display mesh, the more accurate it is, but it's also slower. You could just clone the object, but it's better to use a primitive that will act as a bounding box to the object. | ||
| Line 50: | Line 50: | ||
The collision mesh is done. | The collision mesh is done. | ||
| − | == | + | == Exporting the geometry == |
Open the Tools Tab, then click on MAXScript. next, click on Run Script in the panel that just showed up. Select the file we downloaded earlier. | Open the Tools Tab, then click on MAXScript. next, click on Run Script in the panel that just showed up. Select the file we downloaded earlier. | ||
| Line 70: | Line 70: | ||
In 3dsmax, select your collision mesh and export it again, but this time, make sure main_display IS checked! You'll end up with a new test.txt. Paste it right after the nsippet you pasted earlier. Again, make sure there are no excessive lines in between the snippets. | In 3dsmax, select your collision mesh and export it again, but this time, make sure main_display IS checked! You'll end up with a new test.txt. Paste it right after the nsippet you pasted earlier. Again, make sure there are no excessive lines in between the snippets. | ||
| − | == | + | == Creating and exporting attachement points == |
Let's create an attachement point. The hard part of this is, depending which way you want the point to face, you'll have to create it in different viewports. So, select the Create tab, and in Helpers select the Point object. | Let's create an attachement point. The hard part of this is, depending which way you want the point to face, you'll have to create it in different viewports. So, select the Create tab, and in Helpers select the Point object. | ||
| Line 76: | Line 76: | ||
Here is how you make the point face the proper way, by creating it in the proper viewport: | Here is how you make the point face the proper way, by creating it in the proper viewport: | ||
| − | ''Top:'' The attachment point faces north of the top view | + | * ''Top:'' The attachment point faces north of the top view |
| − | + | * ''Front:'' The attachment point faces south of the front view | |
| − | ''Front:'' The attachment point faces south of the front view | + | * ''Left:'' the attachment point faces west of the front view |
| − | |||
| − | ''Left:'' the attachment point faces west of the front view | ||
After that, you want to export your point data. Select the point, and in the export tools under GMID attachement click Export. Again, copy the contents of c:\test.txt into the reference.gmf file, after, the previous two snippets. Again, make sure there are no unnecessary whitespaces. | After that, you want to export your point data. Select the point, and in the export tools under GMID attachement click Export. Again, copy the contents of c:\test.txt into the reference.gmf file, after, the previous two snippets. Again, make sure there are no unnecessary whitespaces. | ||
| Line 90: | Line 88: | ||
[[Image:3dstut8.PNG]] | [[Image:3dstut8.PNG]] | ||
| − | Type = Attach precises that the point is an attachement point. | + | Type = Attach precises that the point is an attachement point. |
| + | ID = 1 says which attachement point is it (we'll cover multiple attachement points in another tutorial) | ||
| + | Attach = Generic_F says what type of attachement point will it be. Possible values are base_f, base_n, axle_f, axle_m, generic_f, generic_m. I can say Generic_F goes to extenders, Base_F goes to chassis, and Axle_F goes to motors. | ||
| − | + | == Finishing the [[GMF]] and compiling == | |
| − | |||
| − | |||
| − | |||
| − | |||
Make sure that in the [[GMF]] file at the bottom in the RBCollection section the values correspond to the collision and display mesh names. | Make sure that in the [[GMF]] file at the bottom in the RBCollection section the values correspond to the collision and display mesh names. | ||
| Line 103: | Line 99: | ||
Open up the [[GMF]] compiler, and make sure Compile on the bottom is checked. In the source filebox select the reference.gmf file. In destination select a file called just anyway you want it to be, but it'd better be short and without spaces. I'll call mine star.gmf. Click on Compile, and hopefully it should compile with no warnings. If not, make sure the [[GMF]] file is not messed up, and there aren't any unnecessary whitespaces in it. | Open up the [[GMF]] compiler, and make sure Compile on the bottom is checked. In the source filebox select the reference.gmf file. In destination select a file called just anyway you want it to be, but it'd better be short and without spaces. I'll call mine star.gmf. Click on Compile, and hopefully it should compile with no warnings. If not, make sure the [[GMF]] file is not messed up, and there aren't any unnecessary whitespaces in it. | ||
| − | == | + | == Installing the component into RA2 == |
| − | |||
| − | |||
| − | |||
| − | |||
| − | |||
| − | |||
| − | |||
| − | |||
| − | |||
| − | |||
| − | |||
| − | |||
| − | |||
| − | |||
| − | |||
| − | |||
| − | |||
| − | |||
| − | |||
| − | |||
| − | |||
| − | |||
| − | |||
| − | |||
| − | + | Make directory in RA2\Components called like the [[GMF]], eg. star. Copy the compiled [[GMF]] in there, and also create a star_preview.bmp (or whatever_preview.bmp). The preview image will be the preview image in the component selecter, it must be 96x72. | |
| − | + | Next, in the Components directory create a file called star.txt (or whatever.txt). THis'll be our file defining the component. I'll paste my example here: | |
| − | concussion = .8 | + | name = Star |
| − | + | preview = star_preview.bmp | |
| − | piercing = .3 | + | dir = star |
| + | model = star.gmf | ||
| + | type = weapons | ||
| + | base = Weapon | ||
| + | styles = Default | ||
| + | description = Example component. | ||
| + | damagesounds = sounds\chorus_metal_tink.wav | ||
| + | normal = false -1 0 0 | ||
| + | decal = double_slash.tga 0 0 1 .5 .5 1 | ||
| + | attachsound = sounds\cmp_generic.wav | ||
| + | concussion = .8 | ||
| + | piercing = .3 | ||
The values you'll want to change are: | The values you'll want to change are: | ||
name - the Name of your component that will show up in the component library. It can be whatever you wish, contain spaces, etc. | name - the Name of your component that will show up in the component library. It can be whatever you wish, contain spaces, etc. | ||
| − | preview - The name of the preview bitmap | + | preview - ''The name of the preview bitmap'' |
| − | + | dir - ''the name of the component directory'' | |
| − | dir - the name of the component directory | + | model - ''the name of the compiled [[GMF]] file'' |
| − | + | description - ''the component description.'' | |
| − | model - the name of the compiled [[GMF]] file | ||
| − | |||
| − | description - the component description. | ||
| − | == | + | == Give yourself a pat on the back == |
That's it! You made it! Power up RA2, and enjoy the pure awesomeness of yourself! | That's it! You made it! Power up RA2, and enjoy the pure awesomeness of yourself! | ||
[[Image:3dstut10.PNG]] | [[Image:3dstut10.PNG]] | ||
| + | [[Category:Modification Tutorials]] | ||
Latest revision as of 19:31, 3 January 2015
This tutorial will help you create components for RA2 using Autodesk's 3dsmax.
Tools required
- Autodesk's/discreet's 3d Studio Max (tested on 5 and 8 only, may work on others, too)
- A generic text editor like Notepad. I however suggest downloading Notepad++, which is a free, powerful and fast text editor with a tabbed interface.
- Dummy's export script for max This is a fixed version that works in max 8.
- Dummy's GMF compiler This is a fixed version without the annoying "file not found" error.
- Dummy's reference model
Preparations
Create a folder called C:\RA2, you'll store all the files needed in there. Extract the reference.zip to that folder, and you'll get three files: reference.gmf, reference.max and reference.txt. Extract the GMF compiler to the same directory.
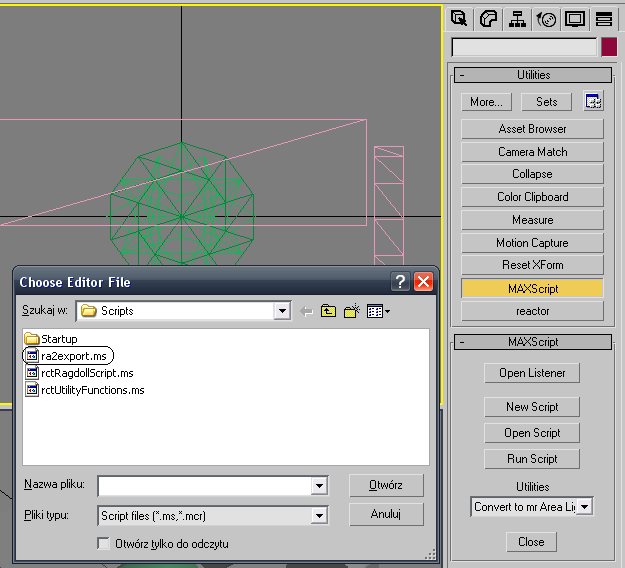
Save the export script to your 3dsmax/Scripts folder as ra2export.ms.
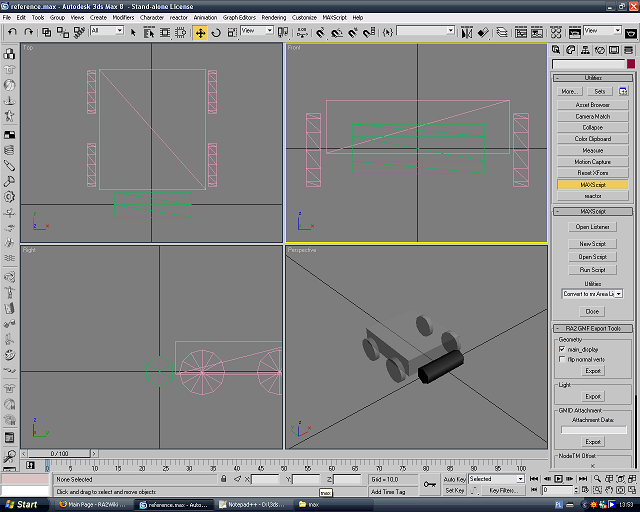
Open reference.max, ignore the warnings. The scene will look like this:
Creating the display mesh.
The display mesh is how your component will look in the robot.
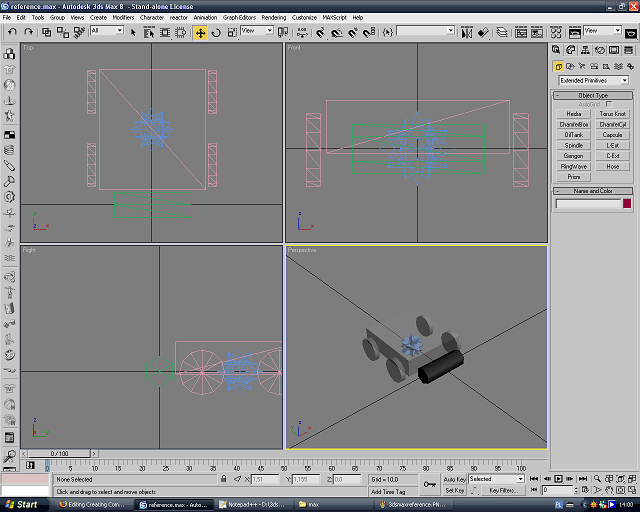
Merge and/or create the component you want. For my example, I'll create a star. Make sure it's in scale with the robot reference.
Now, select the cylinder in front of the robot, and go to the Modify tab. Select all the polygons, and delete them.
Now, in the Edit Geometry group, click the Attach button, and then click on the component to merge it into the object.
Rename the object to example_display (or anything else, but it must end in _display).
The display mesh is done.
Creating the collision mesh.
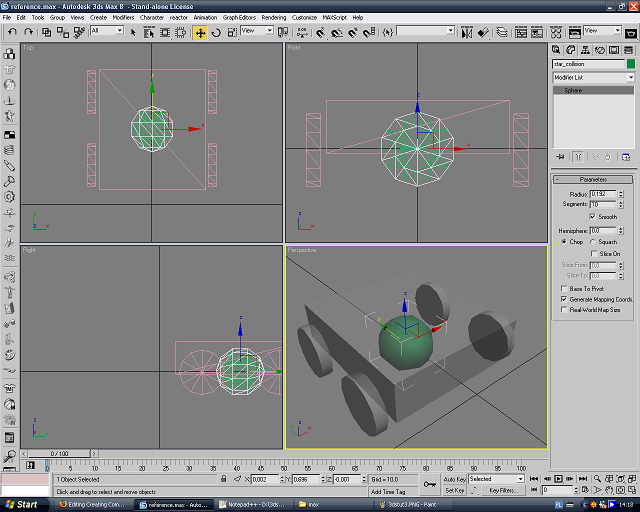
A collision mesh is the mesh RA2 will calculate how does the object react with the environement. The more the collision mesh looks like the display mesh, the more accurate it is, but it's also slower. You could just clone the object, but it's better to use a primitive that will act as a bounding box to the object.
Let's create a 10-sided sphere, since it's the most accurate representation of our star. Next, let's position it so that it acts like a bounding box. It should be named like the display mesh, but instead of _display, it should say _collision.
The collision mesh is done.
Exporting the geometry
Open the Tools Tab, then click on MAXScript. next, click on Run Script in the panel that just showed up. Select the file we downloaded earlier.
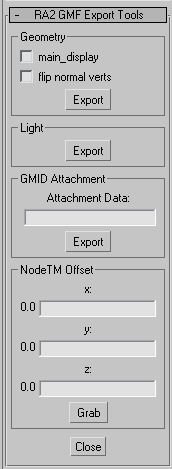
Now, In the rollout select RA2 GMF Export Tools. A new group should come up.
Select your display mesh, make sure main_display is NOT checked (for the curious: checking this would make main_display the geom's parent, we don't want this at the moment). Next, click on Export in the same group. A message box saying "File saved successfully" should pop up. This created a file called c:\test.txt.
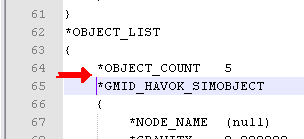
Open your reference.gmf file, then paste the snippet from c:\test.txt right below the line *OBJECT_COUNT 5.
Make sure there are no excess lines before and after the snippet, and the indentations are well followed.
In 3dsmax, select your collision mesh and export it again, but this time, make sure main_display IS checked! You'll end up with a new test.txt. Paste it right after the nsippet you pasted earlier. Again, make sure there are no excessive lines in between the snippets.
Creating and exporting attachement points
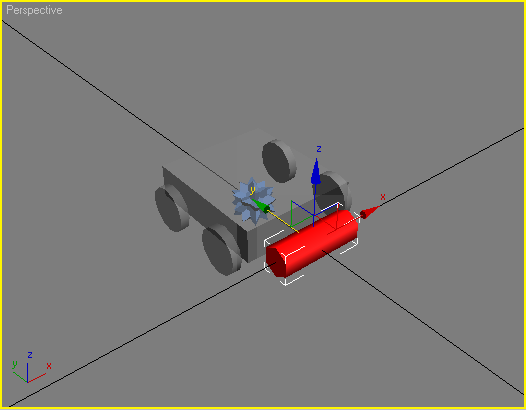
Let's create an attachement point. The hard part of this is, depending which way you want the point to face, you'll have to create it in different viewports. So, select the Create tab, and in Helpers select the Point object.
Here is how you make the point face the proper way, by creating it in the proper viewport:
- Top: The attachment point faces north of the top view
- Front: The attachment point faces south of the front view
- Left: the attachment point faces west of the front view
After that, you want to export your point data. Select the point, and in the export tools under GMID attachement click Export. Again, copy the contents of c:\test.txt into the reference.gmf file, after, the previous two snippets. Again, make sure there are no unnecessary whitespaces.
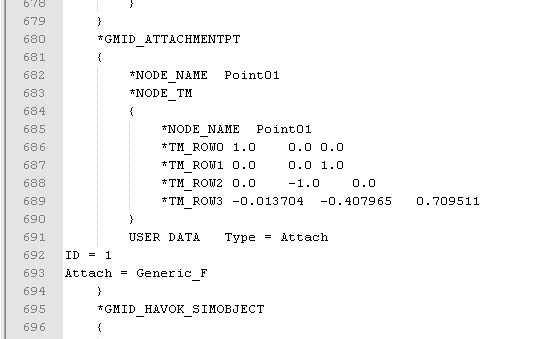
Now, we need to add a few more things after the USERDATA word.
Here, it'll be:
 Type = Attach precises that the point is an attachement point.
 ID = 1 says which attachement point is it (we'll cover multiple attachement points in another tutorial)
 Attach = Generic_F says what type of attachement point will it be. Possible values are base_f, base_n, axle_f, axle_m, generic_f, generic_m. I can say Generic_F goes to extenders, Base_F goes to chassis, and Axle_F goes to motors.
Finishing the GMF and compiling
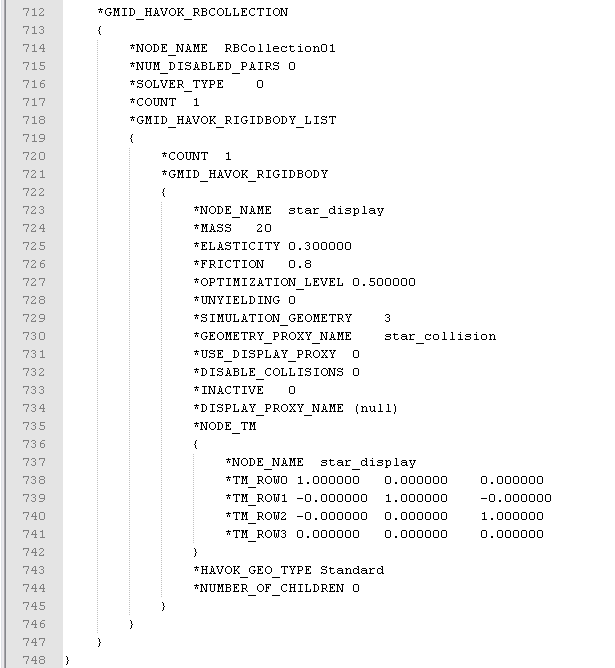
Make sure that in the GMF file at the bottom in the RBCollection section the values correspond to the collision and display mesh names.
Open up the GMF compiler, and make sure Compile on the bottom is checked. In the source filebox select the reference.gmf file. In destination select a file called just anyway you want it to be, but it'd better be short and without spaces. I'll call mine star.gmf. Click on Compile, and hopefully it should compile with no warnings. If not, make sure the GMF file is not messed up, and there aren't any unnecessary whitespaces in it.
Installing the component into RA2
Make directory in RA2\Components called like the GMF, eg. star. Copy the compiled GMF in there, and also create a star_preview.bmp (or whatever_preview.bmp). The preview image will be the preview image in the component selecter, it must be 96x72.
Next, in the Components directory create a file called star.txt (or whatever.txt). THis'll be our file defining the component. I'll paste my example here:
 name = Star
 preview = star_preview.bmp
 dir = star
 model = star.gmf
 type = weapons
 base = Weapon
 styles = Default
 description = Example component.
 damagesounds = sounds\chorus_metal_tink.wav
 normal = false -1 0 0
 decal = double_slash.tga 0 0 1 .5 .5 1
 attachsound = sounds\cmp_generic.wav
 concussion = .8
 piercing = .3
The values you'll want to change are: name - the Name of your component that will show up in the component library. It can be whatever you wish, contain spaces, etc.
 preview - The name of the preview bitmap
 dir - the name of the component directory
 model - the name of the compiled GMF file
 description - the component description.
Give yourself a pat on the back
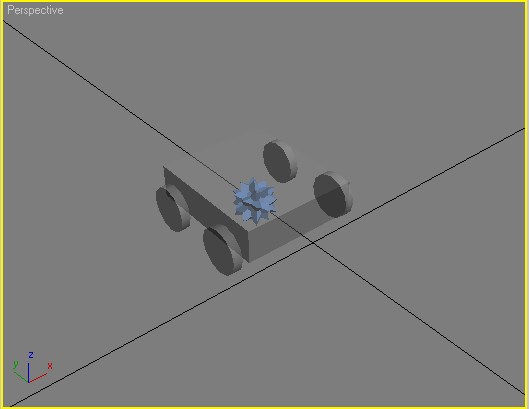
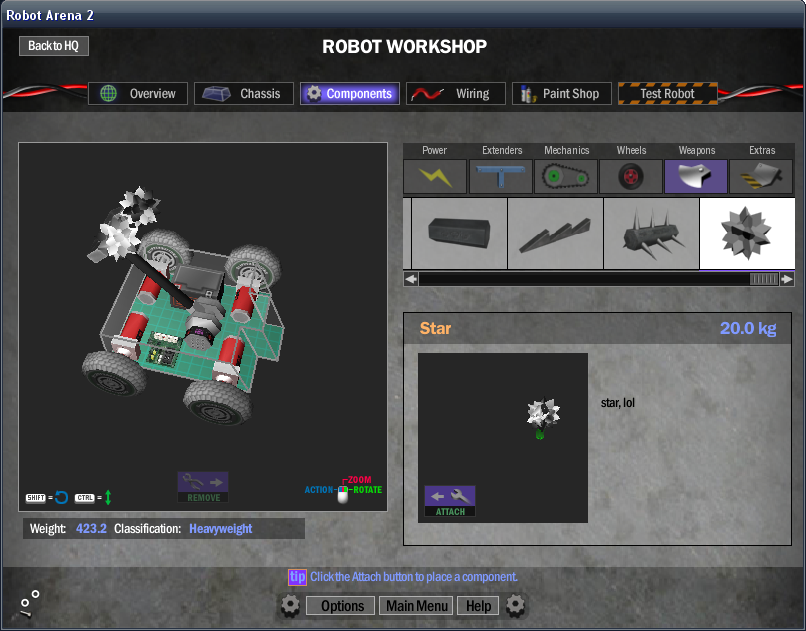
That's it! You made it! Power up RA2, and enjoy the pure awesomeness of yourself!
