Difference between revisions of "Rotating components"
| Line 1: | Line 1: | ||
[[Image:Snapper23gh.png]] | [[Image:Snapper23gh.png]] | ||
| − | |||
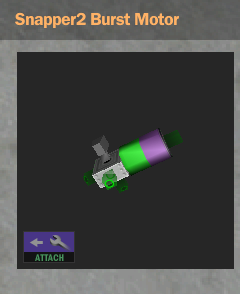
| − | You can see on the picture | + | You can see on the picture above most items in RA have more than one connecting point, they are the small green things you can see on the picture of the snapper2 here (In DSL, these are brown and white). |
| − | One of them is solid green (and bright) and the others are translucent. The solid one is activated. If you click on another one, that one will be the active | + | One of them is solid green (and bright) and the others are translucent. The solid one is activated. If you click on another one, that one will be the active attachment point. You can it connect then to the baseplate or to any other valid attachment point (valid, because you'll notice that you can't attach a wheel to an extender or a burst motor, among others) by this attachment point rather than the usual one. |
Latest revision as of 11:48, 22 February 2009
You can see on the picture above most items in RA have more than one connecting point, they are the small green things you can see on the picture of the snapper2 here (In DSL, these are brown and white).
One of them is solid green (and bright) and the others are translucent. The solid one is activated. If you click on another one, that one will be the active attachment point. You can it connect then to the baseplate or to any other valid attachment point (valid, because you'll notice that you can't attach a wheel to an extender or a burst motor, among others) by this attachment point rather than the usual one.
Sometimes you need to rotate the item in the preview picture, to see all of its attach points. To do so, left click and hold anywhere on the preview picture and move your mouse.
